 |
 |
 |
|
|
|
|
by
Carl N. Cederstrand
Vintage MG Club of Southern California
CMG, OCC, SSTS, NEMGTR, SFPMGTR
with a reprint of Ticky-Tocky Little Boxes by
the late Earl E. Sargent
TC Motoring Guild
This booklet started as a hand out sheet to be distributed at one of the technical sessions to be held at GoF West '97 in Park City, Utah. It soon became obvious that this chronometric mechanism was so elegant and so beautifully made that it warranted whatever effort would be required to put this booklet together. May this booklet be of some interest to my compatriots in the world of T-Series MG's.
In an attempt to ferret out service information on these chronometric instruments, I have been in e-mail contact with Smiths in the U.K. My retrieval results to date (July 1997) have been poor. I had hoped to locate some old timers (retirees) somewhere in the U.K. that had saved technical and service information from the corporate upheavals that plagued The Smiths Automotive Instrument Division during the past twenty five years. Though these gentlemen must exist, I have, so far, been unable to locate them. In another ten years it will be too late. By that time, most of them will be dead.
All the errors in the text are mine. Additional velo bound booklets may be obtained for little more than the cost of having Kinko's make a copy. Contact any one of the following three individuals. In the future, one of us should know where the masters are stored. At present, 1997, the librarian in the VMG (Vintage MG Club of Southern California) stocks a few copies and will have some available for sale.
|
AUTHOR Carl N. Cederstrand 1093 North Cheyenne Street Orange, California 92869-1956 Telephone Number: (714) 771-1453 E-Mail: cederstrand@earthlink.net |
CLUB LIBRARIAN Robert Zwart 9 Redonda Irvine, California 92720-1955 Telephone Number: (714) 261-1112 |
|
CLUB REGISTRAR Peter Thelander 5492 Yale Avenue Westminster, California 92683-3418 Telephone Number: (714) 892-0703 E-Mail: fthelander@hbuhsd.kl2.ca.us |
© Copyright, 1997, by Carl N. Cederstrand / Orange, California. All rights reserved. No part of this booklet may be reproduced in any form for commercial publication without written permission from the author. Permission is granted for individual copies to be made on a one to one basis between interested parties.
This investigation into the historical background of the Jaeger chronometric mechanism has been much fun. There are still many missing pieces in the story, but since it is now July, the text must be put together. Accordingly, I will summarize what I have found, and hope that readers will correct me and supply missing information.
The Jaeger Clock Company in Paris developed the world's first reliable single pointer chronometric tachometer for use in WWI French military aircraft. This was to keep the young lads from over revving those expensive military aircraft engines. Chronometric tachometers were installed in Spads, Nieuports and assorted Allied military aircraft. In fact, these tachometers were so highly regarded by German pilots and mechanics that they would remove the Jaeger tachometers from French aircraft that were shot down close to German airfields. They then refitted the tachometers in their Fokker triplanes and Fokker D. VII's. After Baron Manfred von Richtofen of Jagdgeschwader 1 (The Red Baron of the Flying Circus Squadron) was shot down on June 9th 1918, the command of this squadron was passed on to 22 year old Hermann Göring. Thus, it is likely that when Goring flew over the battlefields of France in 1918, that his Fokker D. VII was fitted with the same tachometer mechanism that resides in our T-Series MGs. How about that?
After WWI, the British subsidiary (British Jaeger) of Jaeger of Paris secured the manufacturing rights to the chronometric mechanism and manufactured these very reliable chronometric mechanisms at a factory at Willesden. In 1927 British Jaeger was purchased by Smiths Industries Limited. These chronometric mechanisms were incorporated in the speedometers and tachometers of English race cars and expensive English sedans. MG installed them in all T-Series until about 1952. After that time, a change was made to the less expensive eddy current (whirling magnet) instrumentation.
I had the occasion to relate this historical sketch to Bill Phy , the mechanical guru of the SFPMGTR (San Francisco Peninsula MG T Register). Bill immediately confirmed that this story was basically correct. He had flown in a WWI Spad in the Midwest in the 40's, and had disassembled its tachometer. Yes, its chronometric mechanism is indeed the same mechanism that resides in our T-Series tachometers and speedometers. Bill also has the memory of the Jaeger chronometric instruments being related to, or descended from, the Hotchkiss chronometer. I know nothing about the Hotchkiss tachometer. This concludes my limited historical information. If you can add words of historical wisdom, please do so.
After I had written the first draft of this booklet, I became involved in a conversation with Mr. Jack Signey and related my delight in delving into the operation of Jaeger chronometric instruments. Jack recalled a similar article on these instruments published decades ago in The Classic Chassis (newsletter of the TC Motoring Guild). He then retrieved the article and provided me with a Xerox copy. Thank you, Jack. This article was written between 15 and 20 years ago by Mr. Earl E. Sargent and has been included in this booklet. The Sargent article includes drawings and is a 'spring A pushes lever B' type of article. My article employs photographs instead of drawings and is more conceptual in nature. The combination of the two articles should be very pleasant as the same mechanism is viewed through two different minds. If one author doesn't describe the mechanism in a manner that fits into your head, perhaps the other one will. Permission to include Earl's article was graciously provided by Jack Signey (editor of The Classic Chassis ) and Larry Sargent (Earl's son). Thank you gentlemen, and my respectful salute to the deceased Mr. Earl Sargent. "Earl, your labor was not in vain - your text will now receive the additional distribution it so obviously deserves." I will now tend to my portion of this booklet and do my best to produce lucid technical text.
The chronometric instruments fitted to the TA, TB, TC, and early TD are delightful mechanical devices. I like them, I am fascinated by them, and I am prejudice toward them! They are busy little mechanisms that will operate for hundreds of thousands of miles. Mine have been oiled somewhat irregularly (bad Carl) and are still operating after 260,000 miles and almost five decades. Their pointers change position in steps and their measurements are quite accurate provided their balance wheels oscillate at the correct frequency. The use of the adjective 'chronometric' describes their capability in counting the number events per unit time. In the case of our instruments, that event is the number of cable revolutions.
My explanation of how our chronometric instruments work will be divided into four sections: In the first section (I), I will assign an arbitrary name to its five (A, B, C, D, E) functional systems. I will next write two explanations of 'how it works'. The first explanation, described in (II), will be the simple explanation (Oh Yea). The second explanation, described in (III), will be more detailed and will be free of the distorting simplifications made in the simple explanation. The final section, section (IV), will describe the mechanical subtleties incorporated in these chronometric mechanisms. Though these subtleties are not essential to grasp the concept of how chronometric instruments work, they are a rousing tribute to their French and English (?) designers.
I. |
Functional Systems | |
| (A) | A CLOCK Chronometric tachometers and speedometers contain clock mechanisms with balance wheel movements. These movements are cleverly driven by the rotating input cable through a slipping clutch. | |
| (B) | A MECHANICAL DIRECTOR (3 lobe camshaft) A three lobe camshaft, whose rotation is driven by the clock, serves as a 'mechanical director'. This camshaft controls the counting and plotting mechanisms. It tells these mechanisms what to do and when to do it. This diminutive 'director camshaft' is a very simple solution to a complicated mechanical problem. | |
| (C) | A TOOTHED BALKING WHEEL (escape wheel) The 'toothed balking wheel' is the escape wheel of the pin lever clock escapement. As such, it serves two functions: (1) It generates a train of impulses to keep the balance wheel oscillating and (2) It serves as balking mechanism which insures the correct rotational speed of the camshaft. | |
| (D) | A COUNTING WHEEL The angular position of the counting wheel corresponds to the total number of revolutions of the input cable. This will be the number of revolutions that have occurred after the counting wheel was reset to zero. The counting information is supplied by a gear train that drives the counting wheel pinion. The counting wheel, superficially looks like a 3/4" diameter gear - it is not a gear. It is a wheel with 150 very small 'saw teeth' cut into its circumference. | |
| (E) | A TRANSFER WHEEL AND THE OUTPUT POINTER The transfer wheel is a ratchet wheel. It effects the transfer of angular position information from the counting wheel to the pointer on the face of the instrument. | |
(consult bold face captions in Photographs 1, 2)
When the input cable starts to rotate, three simultaneous events occur: (A) The clock wakes up and starts to measure time by means of its balance wheel. The clock's balance wheel is driven into oscillation by its pallet and escape wheel, with the escape wheel being driven by the rotating input cable. (B) The counting wheel, now also connected to the input cable, starts to slowly rotate. In this manner, the angular position of the counting wheel corresponds the accumulated number of turns of the input cable. (C) The mechanical director (camshaft) slowly rotates and does nothing else at this time.
After a short interval of time, determined by the clock, the director springs into action and 'tells' all the other mechanical devices what they must do. When this occurs, mechanical pandemonium breaks loose.
The counting wheel is temporarily locked in position, and then disconnected from the input cable. The transfer wheel then duplicates the angular position of the counting wheel and is also locked in position. These wheels are locked in position by leaf spring pawls that are released by the camshaft. The dial pointer, which is 'attached' to the transfer wheel, replicates the angular position of the transfer wheel. The measurement is now complete.
With the pointer now locked in position and displaying the recent counting information, the counting wheel is released and returned to its zero position. The counting wheel is then reconnected to the spinning input cable and starts recounting. In another second, the counting will be finished and the new result will be plotted on the face of the instrument. This endless cycle continues as long as the input cable rotates. That's it.
(Consult all captions in Photographs 1, 2)
You should have a chronometric mechanism in front of you when you struggle through this detailed explanation. All the described events can be observed by turning the input gear and watching the mechanism operate. I can't imagine anyone understanding it without viewing an operating mechanism and then taking it apart and examining the parts.
Do not be afraid to open up your chronometric instruments as they are well made and with a gentle touch you will not injure them. (Rolex watches and 10,000 h.p. marine diesel engines are the same. All machines are the same. They may perform different tasks but they all involve the same basic machine elements. The differences are only the magnitudes of the forces, the scale of the parts, and size of the tooling required to work on them.)
Photograph #1(top view) 
|
Photograph #2(bottom view) 
|
When the input cable begins to rotate, the chronometric mechanism springs to life. It requires two separate and simultaneous rotating inputs. These separate inputs are obtained from two different gears in a gear train of four gears. These four gears have, respectively, 19 - 21 - 20 - 28 teeth. The input cable drives the 19 tooth first gear. This 19 tooth gear is retained on the large zinc casting that brings all the instrument components together: face, input cable, chronometric mechanism, and, when required, an odometer. I have not included a photograph of the zinc frame with the 19 tooth 1st gear - all photographs are of a removed chronometric mechanism. The second gear, located on the brass frame of the chronometric mechanism, possesses 21 teeth. This 21 tooth second gear has a pinion attached to it. This is the pinion that drives the counting wheel. Be aware of how this small pinion is coupled and driven by the second gear. The pinion is driven by a pin drive which allows the pinion to rock back and forth when the pinion is required to engage or disengage from the counting wheel. The 20 tooth third gear is an idler gear that simply transfers motion. The 28 tooth fourth gear drives the escape wheel clutch. The effect of these gear rations is to drive the clutch (at the 4th gear) at exactly 3/4 of the speed of the pinion (at the 2nd gear). This clutch consists of a double cone coil spring between two flat plastic skid washers. One plastic washer presses against the fourth gear, the other plastic washer presses against the escape wheel of the clock escapement. In operation, the clutch has times when it slips and times when it does not slip. During an oscillation of the balance wheel, the clutch is slipping 95% of the time. The arrangement of teeth on the escape wheel determine the time interval during which the counting wheel will be instructed to count the number of rotations of the input cable. This counting interval is exactly 5 oscillations of the balance wheel. The Pin Pallet balks (stops) the escape wheel for most of the time during any oscillation of the balance wheel. Every time the balance wheel goes through its beat position (dead center), the pin lever escapement releases one tooth on the escape wheel. During the time of release (0.02 second), the clutch stops slipping and the resulting small rotation of escape wheel provides the balance wheel with the tiny push it needs to continue in oscillation. This is normal behavior for a clock escapement. To repeat myself: The tiny push on the balance wheel is generated by an escaping tooth on the escape wheel. The escape wheel pushes a pin on the pallet and the pallet, in turn, pushes the balance wheel. The pins on the pin pallet are enormous. The Jaeger escapement could be described as a 'hell-for-stout' Timex watch escapment.
Since the three lobed camshaft is attached to the escape wheel, it experiences the identical motion as the escape wheel. During the 5 timing oscillations, when it is doing nothing except rotating in little steps (jumps), the camshaft runs exactly at clock speed. The 7 teeth on the escape wheel are located asymmetrically around its periphery. (This is completely different from the symmetrically located teeth on the escape wheel of a clock.) As a result, the camshaft is driven at clock speed during that time the counting wheel is counting. It is driven much faster during that time the counting information is transferred to the dial face. More on this clever asymmetry later.
The slipping clutch was Jaeger's solution to the drive problem. The escape wheel in this, and all other clock escapments, requires a constant torque. This, near constant torque, is transmitted to the escape wheel by the slipping clutch. As a result, the balance wheel can measure time while peacefully oscillating back and forth. It is oblivious to all the frantic mechanical activity that periodically occurs around it. The input cable can spin at any speed it desires, since the slipping clutch and balking escape wheel convert all this variable speed rotation into a steady stream of tiny impulses transmitted to the balance wheel. This whole arrangement is quite clever.
The moment of inertia of the balance wheel,. and hence its period of oscillation, is adjusted by means of 'clip on' weights (masses). The balance wheel has no temperature compensation as temperature compensation is not required. It is not necessary to measure engine r.p.m. to ±5 r.p.m. in 5000 r.p.m.
When the time interval for counting has been completed (5 oscillations of the balance wheel), the chronometric mechanism becomes very busy. The lobe on the camshaft next to the escape wheel releases the leaf spring pawl that engages the counting wheel. This pawl prevents the counting wheel from being rotated backwards by its hair spring. An instant later, another cam lobe, the third one from the escape wheel, raises an arm (cam follower) which, in turn, lifts the drive pinion off of the counting wheel. Recall the curious pin drive for this pinion that was mentioned earlier. This drive pin accommodates the rocking movement necessary for the pinion to hinge back and forth and thus engage and disengage the counting wheel.
The counting wheel is now held motionless by its pawl, and its drive pinion, always coupled to the input cable, spins aimlessly in mid air. The, now locked, angular position of the counting wheel corresponds the total number of revolutions made by the input cable during the last five oscillations of balance wheel.
As soon as this locked state is attained, the second lobe on the camshaft depresses the leaf spring pawl that was previously restraining the transfer wheel. The transfer wheel is 'connected' to the dial pointer. The released transfer wheel possesses a 'return to zero' hair spring that then instantly starts to rotate the transfer wheel backwards towards its zero position. This backwards rotation is brought to a sudden halt at an angle determined by the locked position of the counting wheel. These two wheels (the transfer wheel and the counting wheel) interact by means of two heavy pegs. These pegs (one on each wheel) literally crash into each other and abruptly halt all backwards rotation of the transfer wheel. When the pegs touch, the transfer wheel has replicated the angular position of the counting wheel. After this occurs, the second cam lobe releases the transfer wheel's spring pawl which then returns back to its lock position. The transfer wheel is now held motionless in the same angular position as the counting wheel.
Since the pointer is 'attached' to the transfer wheel, the numbers of turns of the input cable in the last unit of time (5 oscillations) are transferred to the dial face as an angular position of the pointer. Cheers!
After this information transfer has been completed, the first cam proceeds to depress the pawl that was locking the counting wheel. With its pawl lifted, the counting wheel's hair spring now returns the counting wheel to its zero position. An instant later, the third cam effects a re-engagement of the aimlessly spinning drive pinion with the counting gear. The counting cycle now repeats itself.
All the activity described above occurs in the blink of an eye - probably less than 1 second.
I have just described the operation of the Jaeger mechanism in the case of decreasing input cable rotation - i.e., the car is slowing down. Something slightly different occurs when the engine and road speed increase - i.e., the input cables are speeding up (accelerating). In this case, the transfer wheel doesn't have to rotate backwards toward its zero position to enable its peg to contact the peg on the counting wheel. The peg on the counting wheel picks up the peg on the transfer wheel as the counting wheel counts to a higher number of input cable rotations. The two pegs lock together and the counting wheel then pushes the transfer wheel along with it as it rotates upscale. This can be accomplished since the transfer wheel and its pawl constitute a true ratchet wheel. When the transfer process later takes place, the transfer wheel doesn't jump backwards because the heavy pegs are already in contact with each other. The transfer wheel is already in position. It has all the counting information it requires. This is why, upon acceleration, our chronometric instruments smoothly increase their readings. The noticeable jumps occur during deceleration when the transfer wheel rotates backwards so its peg can pick up the peg on the counting wheel. One of the joys in driving a chronometric equipped T-Series is observing the action of the tach and speedo. The complicated movement of their pointers continually inform the driver of what is occurring internally in the mechanisms. Watching the tachometer is an unending joy and an ode to all things mechanical.
There are many wonderful subtleties in these chronometric mechanisms. The subtleties are gathered together and discussed here instead of being included in the previous 'how it works' text. Had they been included, the text would have been unbearably long and impossibly laborious.
Photograph #3The adjustable electrical contact (radial arm) is clearly shown against the brown paper-bakelite resin disc, Above it and to the right is the long finger that serves as the other electrical contact. As the disc rotates clockwise the radial arm slides under the long finger and makes electrical contact. You can rotate this arm so the switch closes at any position you choose. Examine the 21 tooth 2nd gear on the . far left. (The 19 tooth 1st gear is still in the large zinc casting and is not shown.) Those ill defined mechanical bits in the shadow are part of the drive pinion mechanism that is responsible for rotating the counting wheel. |
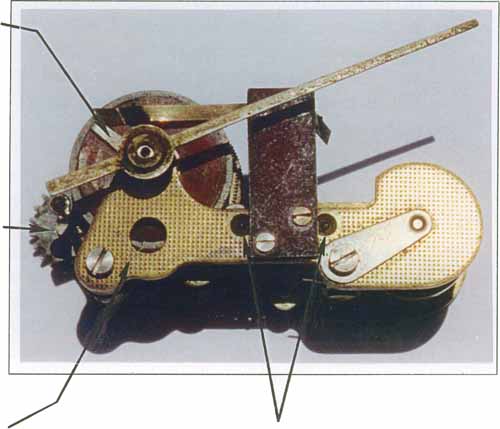 | |
| Observe the regular array of indents that completely cover the brass plate. These are the indents generated in the fl5ttening die that makes the brass plate flat. | Two oil reservoirs are visible. They are located on each side of the large brown rectangular plate that holds the long finger electrical contact. The end cap for the axle of the balance wheel is shown on the left. It is attached by a single large screw. This end cap, and the one on the other brass plate, control the end float of the balance staff (axle) and help retain oil. | |
 |
Photograph #4This photograph displays the small drive pinion that engages and disengages from the counting wheel. This pinion is coupled to the input cable through 2 gears. It rotates at approximately 0.90 X the speed of the input cable. In this photograph, its drive teeth appear as faint lines in the center of the shaft, about 0.4 as long as the shaft. After several hundred thousand miles these teeth will show signs of wear. The disc on the right end of the pinion possesses a slot that receives the drive pin pressed into the 21 tooth 2nd gear. The slot is not visible in this photograph. The conical ends on both ends of the pinion shaft aid in assembly. The sloppy fit in the hole through the journal allows the pinion to rock back and forth. This freedom to rock permits the pinion to engage and disengage its counting wheel. Further hole and journal comments accompany photograph #8 |
(A) |
ESCAPE WHEEL (Consult photographs #2, 8) |
(B) |
FLYWHEEL (Inspect photographs #1, 7) |
(C) |
PROPER OILING RESERVOIRS (Inspect photograph #3) |
(D) |
DEAD BAND WHEEL (Inspect photographs #1, 5) That French designer(s) at the turn of the century thought of everything. "Viva La France." Huzzahs for those hidebound Smiths executives who continued to manufacture this wonderful French design well into the 50s. Accolades for whomever it was at the MG factory who continued to specify these chronometric instruments for the TA, TB, TC, and early TD. |
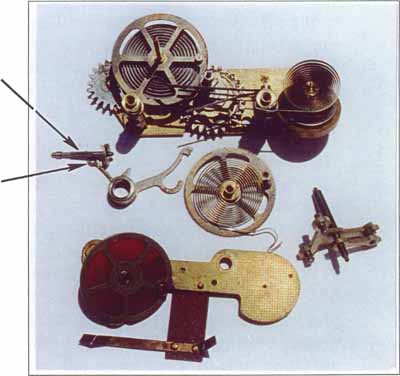
Photograph #5This photograph displays the start of the disassembly of the chronometric mechanism. In the top assembly, the large wheel on the left is the counting wheel. Observe the heavy pin that protrudes upward from the outer end of the spoke at 3:00 o'clock. This is the contact pin that provides the angular information to the transfer wheel. You can not see through the hair spring behind the counting wheel because there is a flywheel behind the hair spring. Below the counting wheel and to the left is the 21 tooth gear with the pin drive (pin not visible) that drives the counting wheel pinion. This pinion is displayed below the 21 tooth gear. On the right side of the upper assembly, is the hair spring associated with the balance wheel. Below the hair spring, in the shadow, are the clip-on weights (masses), and below the clip-on weights is the brass balance wheel. In the center of this plate are the 4 leaf springs (actuating springs) that control the wheels and pinion gear. These 4 leaf springs were stamped out as a unit and are attached to the right stanchion by means of 2 screws. The head of one of the screws is just visible on the top of the right stanchion. Behind this forest of leaf springs, are the escape wheel, its clutch, its drive gear, and the camshaft. | |
In the middle line of four parts, the piece on the left is the counting wheel drive pinion that was mentioned above. The' pinion is, unfortunately, also touching its actuating lever (cam follower).
This cam follower has an eye on one end - (just visible at the pinion) that holds the end of the pinion shaft. The large eye (bearing) in the center of the cam follower allows it to be mounted on the left stanchion that is visible at the 7:00 o'clock position on the counting wheel. The long hook on the right side of the cam follower receives the leaf spring. The foot on the end contacts the cam lobe. |
 |
|
The third item to the right is the transfer wheel. The hair spring that forever tries to return it to its zero position is clearly shown. Sticking up at the edge of this wheel at the 2:30 position (and not I clearly shown) is the slender pin that will drive the dead band wheel. Right above this pin at 2:15 O'clock, is a round spot. This is the swage that secures the heavy pin that bangs into the corresponding pin on the counting wheel. This heavy pin is located on the other side of the wheel. TheThe far item in this line of four parts is the stout pallet of the clock escapement. "It should last forever and it does." Theas one of the contacts for the 30 m.p.h. switch. The bent up end on the right serves as the location to solder a wire. The dead band wheel is still resting on its brass plate and is in its own shadow. The cylindrical receiver that will receive the slender pin from the transfer wheel is in deep shadow. There will be better lighting on the dead band wheel in photograph #6. | |
(E) |
A CLEVER DRIVE PINION (Inspect photos #1, 2, 4) Additionally, since the input cable would also drive the escape wheel backwards, the balking action of the pallet pins on escape wheel no longer exists. With the balking gone, the camshaft immediately rotates backwards at clutch speed. Thus, the drive pinion engages and disengages from the counting wheel at a frantic rate. The moral of this story is, Yes, you can back up your MG, but don't do it at 50 m.p.h., the ratcheting drive pinion wouldn't like it. |
(F) |
TOOTH PROFILES (Inspect drawing #1) |
 | |
(G) |
WARNING LAMP SWITCH (Inspect photograph #3) |
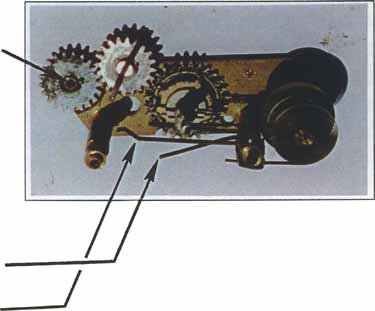
Photograph #6This photograph displays the further disassembly of the chronometric mechanism. The top assembly is a bottom view of the partially stripped down mechanism. In the center is the camshaft with its 3 cam lobes. These 3 lobes depress 3 of the 4 leaf springs (actuating springs) at the right times, distances, and sequences. This plate of 4 leaf springs is secured to the right stanchion by 2 cheese head machine screws. To the right of this stanchion is the balance staff (axle) with its brass balance wheel, clip-on weights (masses), and hair spring. The long shaft to the left of the camshaft is the shaft that receives the 20 tooth idler gear (bakelite resin), counting, transfer, and dead band wheels. Now you understand why a detailed disassembly is required to properly lubricate this mechanism. The left stanchion displays two annular grooves. These two grooves receive the hair springs from the counting and transfer wheels. The tapped hole between these two grooves receives the attaching screw that holds the clamp plate for the hair springs. This attaching screw also has a very long 'dog end' that functions as the zero position stop (abutment stop) for the counting and transfer wheels. | |
|
In the middle line of four parts, the part on the left is the counting wheel drive pinion. This time it was photographed away from its operating lever (cam follower) - cheers! The next part is the pinion operating lever (cam follower). The third and fourth items in this line of 4 parts are the counting and transfer wheels. Their 'crash together' pins are clearly shown Note that there are two of these heavy pins attached to the transfer wheel (wheel to the right). The outer pin is the pin that contacts the pin on the counting wheel to obtain the angular information. |
 |
|
The inner pin will contact the abutment stop (that very long 'dog end') that halts the returning transfer wheel at its zero position. The round spot just to the right of the outer pin is the swage for a pin on the other side. The 'other side' pin is the pin that drives (sticks into) the dead band wheel. Notice the hooks on the ends of both hair springs. These hooks fit into the annular grooves on the left stanchion as was mentioned in the top paragraph. The photograph displays what looks like two hooks associated with the transfer wheel shown on the right. This is a mistake on my part. The hair spring had oil on it and I let it touch the white background paper where it obligingly left an oil print of the spring end. Oh me. The plate located at the bottom of this photograph again has two items of interest. First is the long finger that serves as a contact for the 30 m.p.h. switch. This is now hidden behind the dead band wheel. Its bent up end displays a small spot of unremoved solder from the attachment of its wire. The dead band wheel is still resting on its brass plate and is no longer in its own shadow. The cylindrical receiver, that will receive the pin from the transfer wheel, is now clearly shown. This is the properly illuminated view mentioned in the caption associated with photograph #5. This cylinder only occurs in speedos with the 30 m.p.h. switch, others simply have a hole in the wheel. | |
 |
Photograph #7This photograph displays the counting wheel (on the left) and the transfer wheel (on the right). Both of these wheels have been turned over. The counting wheel now clearly displays its attached flywheel. Observe that the flywheel is not rigidly attached to the counting wheel. It is attached through the clamping action of a 3 fingered spring. This spring may serve as a slipping clutch that limits the impulse that can be generated when the transfer pins collide. Mankind has had many gifted mechanical designers and whoever it was who designed this chronometric movement 80 (?) years ago was certainly one of them. Observe the faintly polished annular ring on the face of the flywheel where the 3 fingers were rubbing. If this ring was generated by slipping during operation, the flywheel incorporates a slipping clutch. When I slip this clutch (?) by hand, I find it very difficult to believe that it would slip in operation - it's too tight. I am undecided about what goes on here. |
| The transfer wheel (on the right) displays the pin which engages the dead band wheel. This pin is located at approximately 10:00 o'clock. A little to the left of this pin is a dark circle. This is the swage for the heavy pin on the other side that will contact (bang into) the heavy pin on the counting wheel. There is also a swage for the heavy 'zero stop' pin, but it is hidden under the hair spring and cannot be seen. That's why only one pin swage is visible and yet there are two heavy pins on the other side. The hooks on the ends of the hair springs are clearly shown. These hooks appear to be double because of their shadows. | |
Photograph #8This view of the rear plate, with a few of its remaining parts, provides a view of the drive pin, in the 21 tooth gear. This pin drives the counting wheel pinion. The pin is located at 3:00 o'clock and close to the hollow journal, on which the 21 tooth gear is mounted. This journal (tube) is staked into the brass plate on one end and flared on the other end. The central hole in this tube receives the counting wheel drive pinion which is able to wobble around as instructed by the pinion operating lever (cam follower). Affixed to the right gear is the brass escape wheel with its 7 asymmetric teeth. Between this escape wheel and its 28 tooth drive gear is the double cone spring and plastic skid washers that constitute the slipping clutch. The clutch is not visible. The 4 leaf springs are in their operating positions below the camshaft. The third leaf from the escape wheel is bent strongly downward to the position required to pull the counting wheel pinion into the counting wheel. The long leaf spring with the catch on its end rubs on the rim of the dead band wheel. |
 |
(H) |
FLAT FRAMES & SHAFT END PLAY (Inspect photo #3) Photograph #5 clearly shows an end plate that is covered with a regular array of small dimples. This is not an accident. Both sides of the brass plates display these regular indents. These indents are `a result of a stamping operation used to flatten the brass plates. A little end play is required for all the shafts supported between the two flattened end plates. The shafts associated with the balance wheel and the pallet typically have about 0.012" end play. The camshaft and the three wheels consistently have less, say 0.003". The wheel shaft holds the 20 tooth idler gear, counting, transfer, and dead band wheels. With all these parts stacked on this shaft, a problem with tolerance accumulation is inevitable. This is the reason for the small copper washers included on this shaft. These packing washers reduce end play in jumps of 0.004". The washers are stamped out of copper and are 0.1 mm thick (0.004"), have a 3 mm O.D. (0.120"), and a 1 mm I.D. (0.040"). They will also found on the camshaft. The numbers and locations of these packing washers depends on the clearances in each individual mechanism. |
Those components that first display wear in these Jaeger mechanisms are: (1) the spring leaf pawls, and (2) the 8 tooth pinion that drives the counting wheel. I obtain spare parts by purchasing chronometric instruments at T-Series swap meets. Though the same parts tend to wear in all instruments, I have purchased excellent mechanisms at swap meets. The glasses may be missing, the bakelite cases may be cracked and broken, but most (say, 80%) of the time, the internals are good. These mechanisms usually failed because of the slow oxidation of their lubricants. Their oils and greases oxidize to gums and varnishes and after several decades these chronometric mechanisms are dragged to a halt. Cleaned and lubricated, they consistently return to life and run beautifully.
Lubrication should be performed with the instrument grade lubricants obtainable from the William F. Nye Company in New Bedford, Massachusetts (508) 996-6721. Call for one of their catalogs. I have built a test stand to drive these tachs and speedos. It incorporates a constant speed electric motor (hysteresis synchronous) so I can be sure of the speed of the input cable With it, the moment of inertia of the balance wheel can be adjusted so that the balance wheel oscillates at the correct frequency and thus produces an instrument with 'spot on' readings. Classical Physics is wonderful! The 'hell-for-stout' escapement is probably still 'in beat' but it can be checked with a head magnifier while everything is exposed. If you live in southern California and want to have a go at this very pleasant cleaning, oiling, and calibration activity, give me a telephone call. I will sit you in the shade on the patio with the tools, a head magnifier, and a glass of ice tea. Much fun. This is a fussy operation that requires hours to perform. Better yet, the VMG may eventually host a Home Garage Tech Session on the lubricating and adjusting of these instruments. Call John Seim at (714) 786-5697 and when John receives sufficient requests he will schedule a date. You can bring your instruments and we will turn chronometric cleaning and oiling into a technical, social, and eating event.
There are two organizations in England, that I know of, that service these chronometric instruments. These are: (1) Vintage Restorations operated by John and Monica Marks. Vintage Restorations is well known in this country and the Marks generally receive high marks (sic) for the quality of their rebuilt instruments. (2) Speedograph-Richfield was formed from the association of Thomas Richfield & Sons, (a Smiths-Jaeger service facility established 1938) and Speedograph, (an instrument manufacturer). Speedograph-Richfield have purchased Smiths and Jaeger inventories from failing instrument businesses throughout the U.K. According to the Speedograph-Richfield sales brochure, they possess the world's largest stock of spare parts and 'new old stock' (NOS) Smiths and Jaeger instruments. They restore Smiths and Jaeger instruments but since they don't advertise in the U.S.A., few people here know they exist. In Southern California, Jaeger instruments are rebuilt at West Valley Instrument by Morris Mintz (818) 758-9500. In the Bay area, at Palo Alto Speedometer (415) 323-0243. In New York, at Nisonger Instruments (914) 381-1952. Nisonger handled Jaeger/Smiths warranty claims for decades.
Both of these English service facilities have net pages. Their net addresses are:
http://www.mgcars.org.uk/vr/index.html
http://www.speedograph-richfield.co.uk/
Joseph Lucas purchased The Smiths Automotive Instrument Division many years ago. VDO later purchased it from Lucas. After a few years of ownership, VDO decided to close down their Smiths Automotive Instruments facility. At that time their English managers got together, purchased the remains of Smiths, and renamed it Caerbont Automotive Instruments. Caerbont now supplies traditional Smiths instruments without the Smiths or Jaeger names printed on the face.
Caerbont instruments are imported to the U.S.A. by Caerbont Automotive Instruments of Lanchaster, Pennsylvania (717) 399-0111. They have appointed XKs Unlimited in San Luis Obispo, CA. (800) 444-JAGS as their sole U.S.A. retail supplier. Automotive instrumentation is not a pressing concern at XKs as this is a Jaguar parts and restoration organization. An alternate supplier would be British American Transfer (BAT) in Sarasota Florida (941) 355-0005. BAT imports Caerbont Instruments indirectly since they are the American representatives for Think Automotive. Think Automotive is a U.K. automotive supply organization that supplies a wide range of proprietary automotive components included in which are Caerbont instruments. The people at BAT and at Caerbont Automotive Instruments are knowledgeable and will graciously provide technical information. My e-mail contact with Smiths in the U.K. has not located anyone who knows what happened to the drawings, parts, and service manuals for the Jaeger Chronometric Instruments. Caerbont has also been a chronometric dead end.
This leads me to Rene's story. In 1974, I had a telephone conversation concerning chronometric spares with Rene Rufenach of Grenchen, Switzerland. During our conversation, Rene related his experiences in going to Smiths in England to purchase chronometric instrument spares. He was informed by someone at Smiths that they had recently taken their chronometric spares and buried them in an English dump under the supervision of a representative of the English taxing authorities. Smiths performed this ritual burial since their annual inventory tax on these parts exceeded what they realized from their annual sale of these parts. Their chronometric instruments were too reliable - they didn't consume spare parts! When lubricated, one hundred thousand miles is of little consequence to these instruments. Burying the parts generated a tax loss. So it goes. All that material and labor buried in the ground because of the usual brainless governmental incompetence and taxing stupidity ... How many pallets of chronometric spares now slowly return to their respective oxides in cold damp soil of England? Oh me! That was Rene's sad story and may be one of the reasons why no one at Smiths today has knowledge of what happened. The old timers have all retired and their long orphaned automotive instrument division has endured three corporate buy outs. Rene needed new faces for his chronometric instruments so he undertook to have T-Series chronometric dial faces fabricated in Switzerland. The faces he had stamped out and screened are identical with the original Jaeger faces, with the exception that his faces, being made in Switzerland, display sharper screening. They are beautiful. He had a small production run made and sells/sold his spare faces at 'give away' prices.
Allow me to close with the same thought as my predecessor, Mr. Earl E. Sargent. To wit: Enjoy your chronometric instruments and muse about their wonderful mechanical complexity. The world will never manufacture their likes again. They have been banished 'in perpetuity' by the twin Gods of Economics and Solid State Electronics. "Sic Transit Gloria Mundi."
May your MGs run till the roads wear out - Best wishes,
![]()
Carl Cederstrand / Brea, California, July 1997